
Basement Finishing Insulation Options Compared: R-Value, Cost, and What Passes Inspection in Aurora
If you are planning to finish your basement in Aurora, insulation is the first decision that locks in everything else. Your basement finishing basement wall insulation options determine how thick your walls get, whether moisture stays out of your framing, and whether you pass the insulation inspection on the first try. This comparison walks through the main choices, what code expects in 2026, and where a DIYer can do the work versus where a pro earns their fee.
One thing up front: this is not the same decision as insulating an above-grade wall. Basement walls are concrete, and concrete moves moisture. According to the American Society of Home Inspectors, more than 60% of U.S. homes with basements experience some degree of water penetration or moisture problems. That number shapes every recommendation below.
What Makes a Good Basement Wall Insulation Strategy
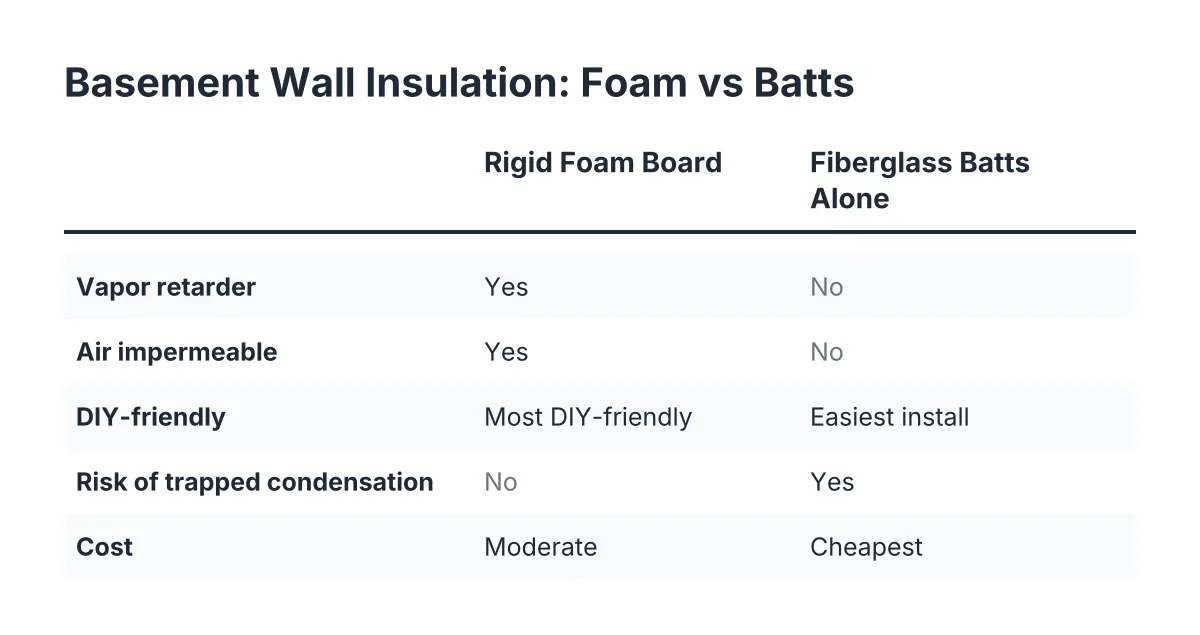
Good basement wall insulation needs three things at once: a high R-value per inch, air impermeability, and the ability to act as a vapor retarder. A material that only delivers one or two of those invites condensation inside your finished wall, which turns into mold you cannot see until drywall comes down.
Here is why that matters in plain terms. Warm indoor air holds moisture. When that air touches cold concrete, the moisture condenses. If your insulation lets air pass through it, you get wet framing behind a wall that looks fine from the couch.
Two materials check all three boxes: taped rigid foam board and closed-cell spray foam. Fiberglass batts alone do not. That does not make batts useless, but it changes where they belong in the wall assembly. Keep that in mind as you read the comparisons below.
For Aurora specifically, the city follows the International Residential Code with local amendments, and finished basement walls in our climate zone need meaningful R-value, not a token layer. Confirm the current required R-value with Aurora Building Division when you pull your basement remodeling permit, because amendments change and the permit desk is the final word.
Comparing the Main Basement Wall Insulation Options for Your Project
There are four realistic paths for insulating basement walls in a finishing project. Each has a different mix of cost, DIY-friendliness, and inspection risk.
Option 1: Rigid Foam Board Against the Concrete
Rigid foam board is the workhorse of basement finishing. You fasten sheets of EPS, XPS, GPS, or polyiso against the foundation wall, tape the seams, then frame a stud wall in front of it. The foam handles the vapor control and gives you a thermal break, so the concrete's temperature swings never reach your framing.
A few rules keep this option out of trouble:
- Run the foam continuous from the slab up to the floor joists, with no gaps behind the framing.
- Tape every seam so the layer is air impermeable, not just present.
- Skip any foam product with a cellulose fiber facer; those facers can degrade and support mold growth.
- Plan for fire blocking where code requires it in wall and ceiling cavities; spray foam sealant is a common way to handle it during the insulation phase.
The trade-off is thickness. Foam plus a framed wall eats floor space, which matters in a low ceiling basement or a tight layout. It also demands patience; sloppy taping is the most common reason this assembly fails the insulation inspection.
For the Permit-Wary DIYer, this is the most DIY-friendly option that still meets the air-impermeable, vapor-retarder standard. The materials are forgiving and the mistakes are visible before drywall goes up.
Option 2: Closed-Cell Spray Foam
Closed-cell spray foam is applied directly to the concrete and expands to seal every crack, penetration, and rim joist gap in one pass. It carries the highest R-value per inch of the common options, acts as its own vapor retarder, and conforms to the uneven, bowed foundation walls older Aurora homes often have.
The downsides are cost and control. Spray foam is the most expensive option per square foot of wall, and it is not a weekend DIY product at whole-basement scale. It also hides the concrete permanently, so any foundation crack you might want to monitor disappears behind foam.
Where spray foam earns its price is the rim joist, the band of framing where your floor system sits on the foundation. That zone leaks air badly and is awkward to seal with board foam. Even homeowners doing rigid foam on the walls often hire out spray foam for the rim joist alone.
Option 3: Fiberglass Batts in a Framed Wall
Fiberglass batts are the cheapest material and the easiest to install; that is why so many older finished basements have them. The problem is what batts cannot do. They are air permeable and they do nothing to retard vapor, so batts placed directly against concrete tend to trap condensation.
Used alone against a foundation wall, batts are the option most likely to produce the moldy, musty finished basement that landlords end up gutting before they can rent the space. Used correctly, batts have a real role: adding R-value inside a stud wall that already has taped rigid foam behind it. Foam handles moisture; batts add cheap R-value. That hybrid is discussed below.
Option 4: The Hybrid Assembly, Foam Plus Batts
The hybrid approach puts a thinner layer of taped rigid foam against the concrete, then fills the framed wall in front of it with unfaced fiberglass batts. You get the vapor control and thermal break of foam plus the low cost per R of batts, usually at a lower total materials cost than thick foam alone.
However, the hybrid has a design rule that trips people up. The foam layer must be thick enough to keep the surface where foam meets batts above the dew point in winter. Too thin a foam layer and condensation forms inside the batts. This is the option where a short conversation with a contractor or the Aurora plans examiner pays for itself before you buy materials.
For a house-hacker finishing a basement bedroom to rent, the hybrid is often the best cost-to-performance balance. It keeps the material budget in check while still producing a wall assembly that passes inspection and protects rental income from a mold problem two winters later. When evaluating your basement wall insulation options, weigh both upfront cost and long-term performance.
Insulation Costs Across Basement Finishing Options
Ranked by typical materials cost per square foot of wall, from lowest to highest, the order runs: fiberglass batts alone, hybrid foam plus batts, rigid foam alone, then closed-cell spray foam. Labor flips part of that order, since spray foam is fast for an installer while rigid foam rewards a careful DIYer's free weekends.
We will not quote dollar figures here, because material prices move and every basement has different wall area, rim joist length, and moisture conditions. A free estimate on your actual basement is more useful than a national average that ignores your foundation. What stays true regardless of price swings:
- Batts are cheapest up front and the most expensive to fix if they get wet.
- The hybrid usually wins on cost per delivered R-value when a DIYer installs it.
- Spray foam costs the most but compresses the schedule and solves rim joists and odd geometry in one visit.
- Rigid foam sits in the middle and gives a hands-on homeowner the most control over quality.
The resale math favors doing it right. According to the JLC (Journal of Light Construction) Cost vs. Value Report, a basement remodel returns 71% of its cost at resale on average, the highest ROI among newly tracked project categories in the 2025 report. A wall assembly that passes inspection and stays dry is what protects that return.
What About the Floor and the Ceiling?
Walls get the attention, but the slab under your feet is a cold, damp surface too. The common fix is rigid insulation laid directly over the slab with joints staggered and offset, which works as both a thermal break and a secondary capillary break under your finished floor. Whether you need it depends on the slab's condition, any damp spots, and whether a vapor barrier exists beneath the concrete; a vapor barrier under a slab exists to block moisture moving up from the ground, according to W. R. Meadows. Many older Aurora slabs were poured without one.
The ceiling is simpler. Between a finished basement and the heated house above, insulation is optional and mostly about sound. If you are building a basement guest suite or a rental bedroom, batts in the ceiling joists are cheap sound control, and this is one place plain fiberglass is exactly the right tool.
Do You Need a Permit for Basement Insulation in Aurora?
Yes. In Aurora, insulation installed as part of finishing a basement falls under your basement remodeling permit, and it gets its own inspection. A typical finishing project has an electrical rough-in inspection first, then an insulation inspection after foam and batts are in but before any drywall hangs. Skip that sequence and the city can make you open walls back up.
This is where the DIY-versus-pro line usually lands for permit-wary homeowners. Suppose a homeowner near Del Mar Park buys a house with an unfinished basement and wants to add a legal bedroom to rent. In that scenario, a sensible split looks like this: hire out the egress window cut and the electrical, pull the permit properly, then install taped rigid foam and batts personally, call for the insulation inspection, and hang drywall only after the green tag.
The egress window is not optional for that bedroom. Under the IRC 2024 code, every basement sleeping room needs an emergency escape and rescue opening with at least 5.7 square feet of net clear opening, according to EgressUSA. The opening also has a maximum sill height of 44 inches above the finished floor and a minimum net clear width of 20 inches, according to The Great Egress Co. Egress window sizing interacts with your insulation plan too, because wall thickness changes how the window well and interior trim get built.
One honest limitation: if your basement shows active water intrusion, efflorescence, or a cracked foundation wall, stop before insulating. No insulation option fixes a water problem; it only hides one. Get the moisture source diagnosed by a professional first, because sealing a wet wall behind foam is how tear-out stories start.
How to Choose
Match the option to your basement, your labor, and your plans for the space.
- Choose rigid foam board if you are a hands-on DIYer with time, a reasonably flat foundation wall, and a willingness to tape seams carefully.
- Choose the hybrid foam-plus-batts assembly if you want the best cost per R-value and you have confirmed the foam thickness keeps the batts above the dew point.
- Choose closed-cell spray foam if the schedule is tight, the walls are irregular, or you are finishing a rental unit and want the fewest moisture callbacks.
- Choose batts alone only for interior partition walls and ceiling sound control, never directly against concrete.
Whichever way you go, settle insulation before you settle layout. Wall thickness changes your usable floor area, which changes everything from small basement bar ideas to where a bedroom and bathroom fit. Even very small basement ideas and modern basement ideas from national photo sites assume a wall assembly; yours has to be the one that passes an Aurora inspection. Once the insulation decision is made, the rest of your basement design ideas can be drawn on a floor plan you actually trust.
The pattern that works for most Aurora homeowners is simple. Confirm required R-values at the permit desk, fix any water problems first, pick the assembly that fits your budget and skills, and schedule the insulation inspection before drywall. Compare your basement wall insulation options against your specific walls and moisture conditions, not against a photo from a house two climate zones away, and the finished space will hold its value.
If you need basement finishing, Aurora Basement Finishing Pros can help.
Prefer to talk it through? Call (720) 973-5727 — a quick call is usually the fastest way to get a straight answer for your situation.