
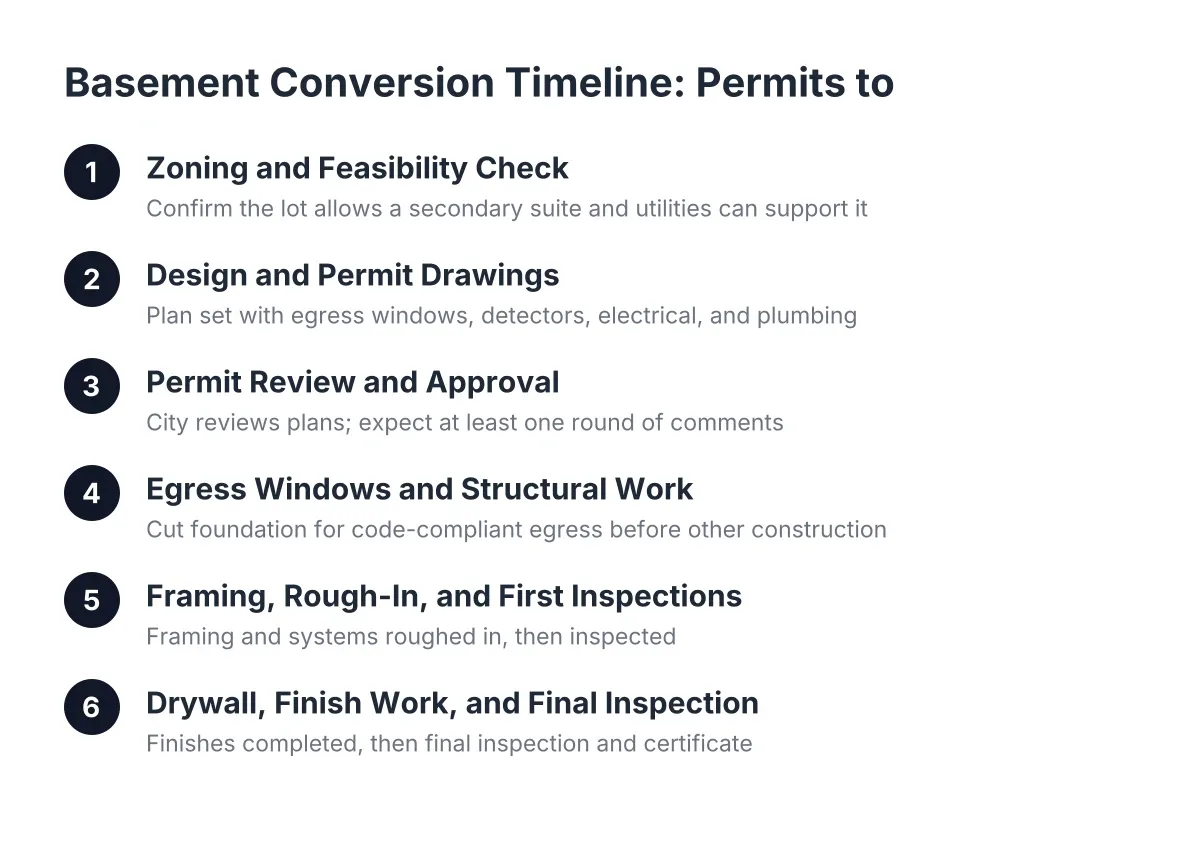
Basement Suite Conversion Timeline in Aurora: Permits to Tenant-Ready
You have decided to turn your unfinished basement into a rental suite. Now you need to know how long it will take and what order the work happens in. A realistic basement suite conversion timeline in Aurora runs from your first permit drawing to the day a tenant signs a lease, and most of the delays people hit come from skipping steps early, not from slow construction. This guide walks through each phase in order, flags where DIYers can save money legally, and shows where the schedule connects directly to whether you can lease the space at all.
That last point matters more than most timelines admit. A basement suite you cannot legally rent is a finished basement with a kitchenette, nothing more. Every week you spend on permits, egress, and inspections buys you something concrete: the right to collect rent without worrying about a complaint, a fine, or a tear-out order. Plan the schedule around compliance first and finishes second, and the project pays you back.
Why the Timeline Matters More for a Rental Than a Rec Room
If you were finishing a basement for your own family, a missed inspection or a delayed permit would cost you time and annoyance. For a rental suite, it costs you rent. Every month the suite sits unrentable is income you planned on and did not collect.
The compliance side also carries more weight. A rec room that never got a final inspection is a resale headache. A rental suite without permits is a legal problem with a tenant living in it. If the city discovers unpermitted work in a leased space, you can face fines, a forced vacancy, and open-wall corrections while the unit sits empty.
Therefore the smart way to read this timeline is not "how fast can I finish" but "in what order do I clear the legal hurdles so the finish work never has to be redone." That ordering is what separates a suite you can lease from a suite you have to explain to a buyer later.
Understanding Your Basement Conversion Timeline in Aurora
Here is the full sequence for a basement rental suite conversion in Aurora, in the order the work actually happens. Your project may compress or stretch individual phases, but the order rarely changes, because each inspection gates the next stage of work.
Phase 1: Zoning and Feasibility Check
Before you draw anything, confirm that your property can legally host a rental suite at all. Aurora regulates whether a basement can operate as a separate dwelling unit, and the rules differ depending on whether you are renting rooms within your home or creating a true second unit with its own kitchen and entrance.
Check three things first:
- Whether your zoning allows an accessory dwelling unit or secondary suite on your lot
- Whether your ceiling height, window locations, and stair access can meet habitable space requirements
- Whether your furnace, electrical panel, and water heater have capacity for a second living unit
This phase is research and phone calls, not construction. Rushing past it is the single most expensive mistake in this entire process. Suppose a homeowner near Del Mar Park frames walls and runs a kitchenette before learning the lot does not permit a second dwelling unit. In that scenario, the finish work is fine but the rental plan is dead, and no amount of drywall fixes zoning. A basement conversion timeline in Aurora depends entirely on confirming these legal permissions upfront.
Phase 2: Design and Permit Drawings
Next comes the plan set. For a rental suite you need more than a sketch on graph paper. The city will want a floor plan showing room uses, egress window locations and sizing, smoke and carbon monoxide detector placement, electrical layout, and any plumbing for a bathroom or kitchenette.
This is also where you design a basement that actually rents. Tenants pay for a real bedroom, a full bathroom, laundry access, and daylight. A legal bedroom in a basement requires an egress window that meets code, so the window locations drive the layout, not the other way around. If your foundation walls limit where an egress window can go, design the bedroom around that spot.
For a permit-wary DIYer, this phase is where a contractor earns their fee even if you plan to swing the hammer yourself. Basement remodeling permit assistance means the drawings answer the plan reviewer's questions before they ask them, which shortens the review and keeps corrections off your schedule.
Phase 3: Permit Review and Approval
Once you submit, the city reviews the plans. Review time varies with the city's workload and how complete your submission is. A clean plan set with egress window sizing called out, electrical loads listed, and smoke detector locations marked moves faster than one that triggers a correction letter.
Plan for at least one round of comments. It is normal. Respond fast and completely, because each back-and-forth cycle adds weeks. This is the quietest phase of the basement conversion timeline in Aurora and the one homeowners most often underestimate, since no visible work happens while the clock runs.
Phase 4: Egress Windows and Structural Work
Construction starts with the heaviest, messiest work: cutting the foundation for egress windows and any separate entrance. Doing this first protects everything that comes after. Concrete cutting throws dust and water; you do not want it happening next to finished drywall.
Egress is not optional for a rental bedroom. Under the IRC 2024 code, every basement sleeping room needs an emergency escape and rescue opening with at least 5.7 square feet of net clear opening, according to EgressUSA. The opening also needs a minimum net clear width of 20 inches and a maximum sill height of 44 inches above the finished floor, according to The Great Egress Co. An existing window that looks big enough often fails one of these numbers, so measure before you assume.
If your basement already has some finished area, there is a useful shortcut. A structural frame system installed from the exterior can let the crew cut the opening back only to the interior stud line, which avoids tearing out existing drywall and framing. That one decision can save days of demolition and patching.
Phase 5: Framing, Rough-In, and the First Inspections
With the holes cut and windows set, framing goes up. Then the trades rough in electrical, plumbing, and HVAC inside the open walls. For a rental suite, this phase includes the systems that make the unit self-sufficient: bathroom supply and drain lines, kitchenette rough-in if your plans include one, and any ductwork changes to heat the space properly.
Expect two separate inspections early in this stretch. An electrical rough-in inspection comes first, and an insulation inspection follows later, after the wiring passes and the walls are insulated. You cannot hang drywall until both are signed off. Scheduling these back to back without a gap is one of the biggest timeline wins available, so have the insulation materials on site before the electrical inspector arrives.
This phase is also where the DIY line sits. Hire a licensed electrician and a licensed HVAC contractor even if you plan to do the framing, drywall, and finish work yourself. Those trades carry licensing requirements and real safety stakes, and a failed rough-in inspection stalls everything behind it. Framing, by contrast, is forgiving work a careful DIYer can do well.
Phase 6: Drywall, Flooring, and Finish Work
After insulation passes, the project speeds up visually. Drywall, tape, texture, paint, flooring, trim, doors, and fixtures go in. This is the longest stretch of hands-on work but the most predictable, because no inspections interrupt it until the end.
Two rental-specific choices deserve attention here. First, moisture protection under the flooring. More than 60 percent of U.S. homes with basements experience some degree of water penetration or moisture problems, according to the American Society of Home Inspectors. A tenant's flooded bedroom is a much bigger problem than your own, so a subfloor system that handles minor moisture events is cheap insurance, even in a basement with a vapor barrier under the slab.
Second, layout discipline. A common wasteful pattern leaves the space at the bottom of the stairs as unfinished storage and finishes only one side of the basement. In a rental suite that dead zone is lost square footage tenants would pay for, so plan the entry area as usable living space from the start.
Phase 7: Final Inspection and Certificate of Completion
The final inspection checks the whole picture: egress windows operate and meet sizing, smoke and carbon monoxide detectors work, GFCI outlets test correctly, handrails are secure, and the mechanical systems run safely. Pass it, and the permit closes.
For a rental, do not stop at the building permit. Aurora requires licensing for residential rental properties, so confirm the current 2026 rental licensing requirements with the city before you advertise the unit. The building final makes the space legal to occupy; the rental license makes it legal to lease. Both belong on your schedule.
Phase 8: Tenant-Ready Punch List
The last stretch is short but easy to forget when estimating a basement suite conversion timeline. Budget time for cleaning, touch-up paint, appliance delivery and hookup, lock changes or keying for the separate entrance, photos, listing, and tenant screening. None of it is construction, and all of it stands between a passed final and a signed lease.
What Stretches a Conversion Schedule, and What You Control
Most delays trace back to a short list of causes. Knowing them in advance is how you plan a schedule you can actually hit.
- Incomplete permit drawings that trigger correction cycles with the city
- Egress windows ordered late; cut openings sized before windows are confirmed
- Failed rough-in inspections from DIY electrical or plumbing work
- Trades scheduled in the wrong order, leaving crews waiting on each other
- Material price spikes that force mid-project substitutions or pauses
- Moisture problems discovered after drywall is up instead of before framing
You control more of these than you might think. Complete drawings, early window orders, and licensed trades for the licensed work remove the three biggest risks. On material pricing, timing is a legitimate lever; when prices are climbing sharply, waiting a season for them to stabilize can beat starting mid-spike and absorbing the increase across the whole job.
One caution on existing work. If your basement came with old framed walls and insulation stacked against the concrete, tearing it out and starting clean usually beats building on top of it. It feels slower. It is faster than discovering mold or out-of-plumb framing after your new drywall is hung, and a professional evaluation is worth getting before you decide.
An Illustrative Aurora Schedule from Drawings to Lease
To make this concrete, here is a hypothetical project. Say a homeowner in the Saddle Rock area buys a house with an 1,100 square foot unfinished basement and wants a one-bedroom suite with a separate entrance to rent out. He plans to do framing, drywall, and paint himself and hire out egress, electrical, plumbing, and HVAC.
A realistic sequence for that project looks like this:
- Two to three weeks confirming zoning, measuring the basement, and settling the layout
- Two to four weeks producing permit drawings with egress sizing and electrical plans
- Several weeks of city plan review, with one correction cycle built in
- One week cutting and setting two egress windows and the exterior entrance
- Two to three weeks of framing at a DIY evenings-and-weekends pace
- One to two weeks of licensed rough-in work, then the electrical and insulation inspections
- Four to six weeks of DIY drywall, paint, flooring, and trim
- One to two weeks for final fixtures, the final inspection, and the rental license
- One to two weeks of punch list, photos, and tenant screening
In that scenario the project spans roughly five to seven months, and the DIY phases, not the contractor phases, set the pace. A full-service crew compresses the drywall-through-trim stretch the most, which is exactly where a hands-on homeowner saves the most money by going slower. That is the trade-off in plain terms: your labor is free, but your weekends are the schedule.
Treat those durations as illustrative, not quoted. Your foundation, your city review queue, and your own available hours move every number. A free estimate on the specific scope you plan to hire out is the only way to pin the contractor phases down for your house.
Does a Faster Basement Conversion Timeline in Aurora Change the Return?
A faster basement suite conversion timeline improves return mainly by starting rent sooner, not by cutting build cost. Each month saved on the schedule is a month of income added on the other end, which is why permit preparation and inspection sequencing, the cheapest phases to speed up, deliver the best return per dollar of effort.
The resale side rewards doing it right more than doing it fast. A national basement remodel returns 71 percent of its cost at resale on average, the highest return among newly tracked project categories, according to the JLC (Journal of Light Construction) Cost vs. Value Report. For rental suites specifically, the return story runs through rent collected plus resale value, and both depend on the suite being legal. An unpermitted suite subtracts from a sale; a documented, inspected one adds a selling point a buyer's agent can verify.
Finish quality matters here too. A basement finished halfway, with cheap materials and a compromised layout, tends to return poorly. The conversions that hold their value commit fully: proper egress, real moisture protection, a layout that uses the whole floor, and finishes consistent with the rest of the house. If you are preparing to sell within a few years, carrying the main floor's design language down the stairs, even something as simple as matching trim or a consistent wall treatment on the stairwell, signals to buyers that the suite is part of the house, not an afterthought.
Your Pre-Start Checklist Before Week One
A basement rental suite conversion rewards the homeowner who front-loads the boring work. Before any demolition or framing, run through this list:
- Zoning confirmed for a secondary suite or ADU on your specific lot
- Ceiling heights measured everywhere, including under ducts and beams
- Egress window locations identified and sizing checked against the 5.7 square foot, 20 inch width, and 44 inch sill height requirements
- Panel capacity and furnace capacity assessed for a second unit
- Moisture history checked: stains, efflorescence, or past flooding on the slab and walls
- Permit drawings complete, with electrical, plumbing, and detector locations shown
- Licensed electrician, plumber, and HVAC contractor lined up for rough-in windows on your calendar
- DIY scope honestly matched to your available hours per week
- 2026 rental licensing requirements confirmed with the City of Aurora
Clear that list and the construction phases run in order without surprises. Skip items on it and the schedule becomes a guess. The homeowners who hit their move-in date are not the ones who built fastest; they are the ones who never had to stop, reopen a wall, or wait on a correction letter. Plan the timeline around the inspections, keep the licensed work licensed, and the suite you finish will be one you can actually lease.
If you need basement finishing, Aurora Basement Finishing Pros can help.
Prefer to talk it through? Call (720) 973-5727 — a quick call is usually the fastest way to get a straight answer for your situation.