
DIY Basement Finishing vs. Contractor: What You Can Build and What Will Bite You
If you are weighing DIY basement finishing split approaches against hiring a contractor, the honest answer for most Aurora homeowners is a split. Some of the work is forgiving enough to learn as you go. Some of it fails inspection, violates code, or costs more to fix than it saved. This guide walks the decision step by step so you can see where a DIY basement finishing contractor hybrid approach makes sense, where to do the work yourself, and where the permit process forces your hand.
Here is the honest framing. A basement is one of the better places in a house to practice carpentry. Cosmetic mistakes down there are rarely seen. But a basement is also where egress code, moisture, and inspections intersect, and those three things do not forgive guesswork. A national basement remodel returns 71% of its cost at resale on average, the highest ROI among newly tracked project categories in the 2025 Cost vs. Value Report, according to JLC (Journal of Light Construction) Cost vs. Value Report. That return only holds if the work is permitted and passes inspection. An unpermitted basement bedroom is not a bedroom when you sell, and it is not a legal rental unit either.
Work through these steps in order. Each one is a real decision point, not filler.
Step 1: Decide What the Finished Basement Has to Do
Before you price anything, write down the job the space has to perform. A basement guest suite layout with a bedroom and bathroom has different code requirements than an open concept basement design used as a family room. A home theater or wet bar adds wiring and plumbing. Additionally, a legal rental unit adds egress, and in some cases separate entry considerations.
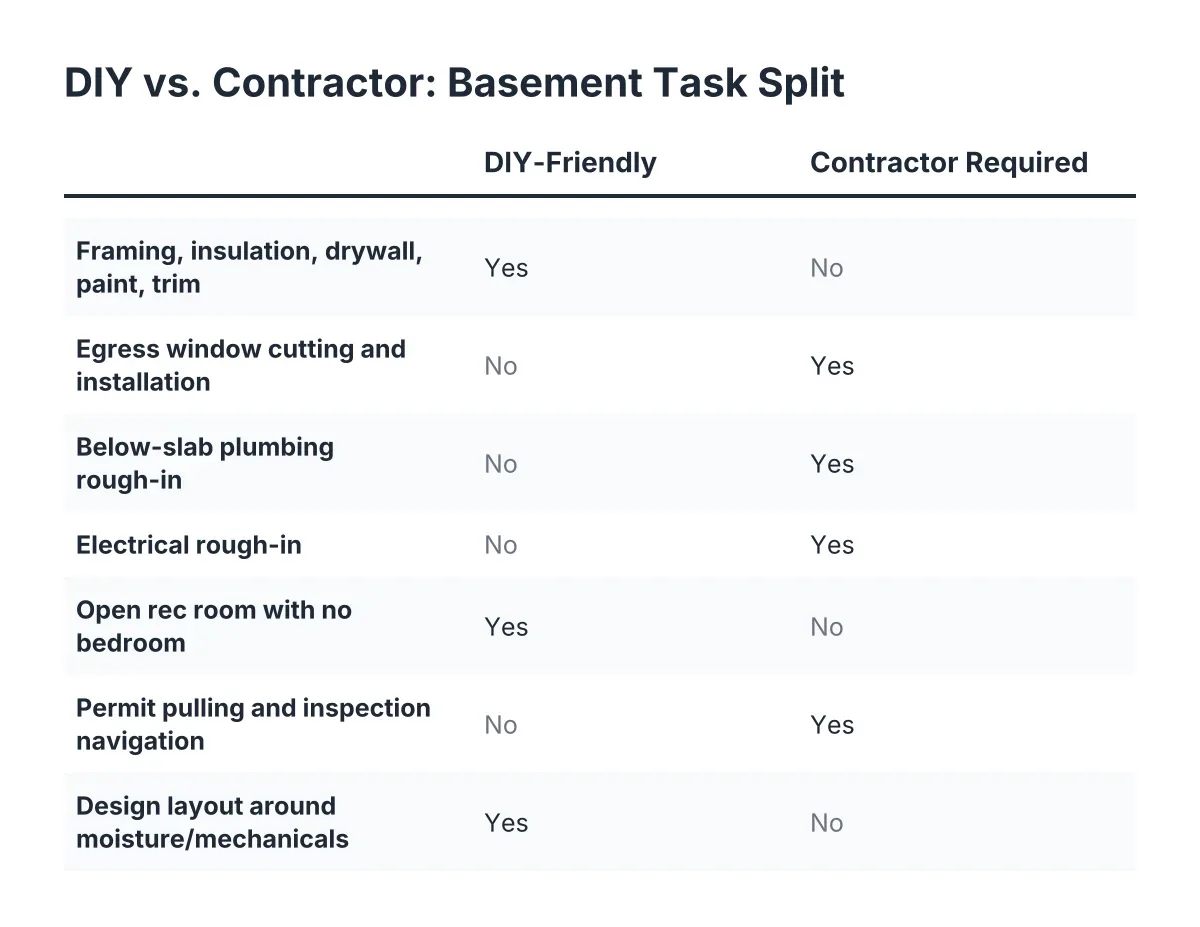
This matters for the DIY question directly. An open rec room with no bedroom is the most DIY-friendly plan there is. Add a sleeping room and you have triggered egress window requirements. Add a bathroom and you have triggered plumbing rough-in, which most homeowners should not attempt below slab level.
For example, suppose a house-hacker in an Aurora rental-heavy zip code wants a basement bedroom, bathroom, and small living area to rent out. In that scenario, the egress window, the below-slab plumbing, and the electrical rough-in are contractor and licensed-trade work. The framing, insulation, drywall, paint, and trim could all be owner work if the owner has the time. That split is the realistic version of a DIY basement finishing split, not the YouTube version where one person does everything.
Step 2: Check Moisture and Ceiling Height Before You Buy a Single Stud
More than 60% of U.S. homes with basements experience some degree of water penetration or moisture problems, according to the American Society of Home Inspectors. Finishing over a moisture problem is the most expensive mistake in this entire trade. Tape plastic sheeting to the slab and walls for a few days and check for condensation. Watch the basement through at least one heavy rain if you can.
Next, measure ceiling height everywhere, including under ducts and beams. A low ceiling basement is not a dead end, but it changes the design. Soffits, rerouted ducts, and careful lighting placement are how low ceiling basement solutions actually work, and those choices need to happen on paper before framing starts.
This is also the stage where basement design ideas should get filtered through what is buildable. A wet bar under the lowest duct run, or a theater wall where the sewer cleanout sits, looks fine on Pinterest and fails in your actual basement. Design around the mechanicals you have.
Step 3: Basement Egress Requirements for DIY Finishing Splits
Egress window sizing is not negotiable, and it is the single most common reason a DIY basement bedroom fails inspection. Under the IRC 2024 code, every basement sleeping room must have an emergency escape and rescue opening with a minimum 5.7 square feet of net clear opening area, among other simultaneous size criteria, according to EgressUSA. In addition, egress window emergency escape openings must have a maximum sill height of 44 inches above the finished floor and a minimum net clear opening width of 20 inches, according to The Great Egress Co.
Those numbers have to work together at the same time. A window that hits the width minimum can still fail the total opening area. Cutting a concrete foundation wall, setting the window, and building the well and drainage is work most homeowners should hand to a basement escape window installer. The consequences of a bad cut in a structural wall are not cosmetic.
For a landlord, this is the step that makes or breaks the rental math. No compliant egress window means no legal bedroom, and no legal bedroom means you cannot advertise or rent the space as one.
Step 4: Pull the Basement Remodeling Permit, Every Time
A basement remodeling permit is not optional in Aurora, and skipping it is the worst trade you can make. Unpermitted work surfaces at sale, at refinance, and at insurance claims. For a rental unit it can surface sooner, the first time a tenant or inspector asks questions.
Plan for the inspection sequence too. A typical basement finish gets inspected at least twice early on: an electrical rough-in inspection first, then an insulation inspection before drywall covers the walls. If you drywall before rough-in sign-off, the inspector can make you open the walls back up. Permit assistance is one of the places where even committed DIYers lean on a contractor, because a local contractor already knows what Aurora reviewers look for on basement plans as of 2026.
Step 5: How DIY and Contractor Work Splits in Basement Finishing
This is the core decision, and the approach to splitting work deserves a line-by-line method rather than all-or-nothing framing. A realistic split for a capable homeowner looks like this:
- Hire out: egress window cutting and installation, electrical rough-in, any HVAC changes, below-slab plumbing, and structural work. Electrical and HVAC require licensed trades for good reason, and inspectors check that work closely.
- Either way: framing, insulation, and drywall hanging. These are learnable, but they are also where speed and inspection knowledge earn a contractor their fee.
- Good DIY candidates: drywall finishing in closets and utility areas, painting, door hanging, trim, and flooring like carpet or click-together planks.
Be honest about trim in particular. Homeowners consistently underestimate it. A finished basement has more baseboard, casing, and paneling detail than almost any other room in the house, and it eats weekends. On the tool side, the budget is smaller than people fear; a utility knife ends up being the most-used tool on the whole job.
One more caution. Romex run exposed along a wall, or stuffed inside EMT conduit in a damp location, is against code under the National Electrical Code (NFPA 70). Wiring shortcuts like that are exactly what rough-in inspections exist to catch, which is why the electrical scope belongs with a licensed electrician.
Step 6: Price the Hybrid, Not Just the Extremes
Most online comparisons price full DIY against full contractor and call it a day. The hybrid is where budget-first planners actually land. Get a free estimate for the whole job first, then ask the contractor to price the version where you handle paint, trim, and flooring yourself. The gap between those two numbers is your real DIY savings, and it is usually smaller than the all-DIY articles suggest, because the expensive line items are the licensed trades you were never going to do anyway.
This also protects you from the quote-variance problem. When one bid comes in far below the others, check whether it includes the permit, the egress window, and the inspections. A cheap quote that skips those is not cheap; it is incomplete. A detailed scope from a local contractor conversation, where you say plainly which tasks you intend to keep, gives you an itemized baseline that makes every other bid readable.
Timing is a fair lever too. If material prices are spiking, waiting a season can beat starting mid-spike. Carpet instead of premium plank flooring is another honest cost cut that also quiets echo in a big open basement room.
Step 7: Lock the Layout, Then Finish in the Right Order
Once the trades are scoped and the permit is in motion, commit to the floor plan. Two layout rules do most of the work. First, finish the space at the bottom of the stairs; leaving it as raw storage while finishing only one side wastes the most visible square footage in the whole basement. Second, place the bedroom on the wall where the egress window goes, not wherever the furniture fits best, since a basement design with egress window placement drives everything else.
Then build in sequence: any concrete cutting and egress work, framing, rough-ins, inspections, insulation, inspection again, drywall, paint, flooring, trim, and doors. Small design decisions near the end, like matching cabinet paint to wall color across the whole basement instead of treating each area separately, are what make a DIY-assisted project read as professionally finished.
One limitation worth stating plainly: if your basement shows active water intrusion, foundation cracks wider than hairline, or settling, stop and bring in a professional before any finishing plan moves forward. No layout survives a wet floor.
The Bottom Line on DIY vs. Hiring It Out
The DIY-versus-contractor question is rarely either-or. Keep the paint, trim, and flooring if you want the savings and the sweat equity. Hand off the egress window, the permit navigation, the electrical, and anything below the slab. A straight answer on the cost to finish a basement starts with a free estimate scoped to your actual plan, with your DIY tasks carved out in writing, so the number you budget against is the number you build against.
If you need basement finishing, Aurora Basement Finishing Pros can help.
Prefer to talk it through? Call (720) 973-5727 — a quick call is usually the fastest way to get a straight answer for your situation.